How to Set Up and Verify Your Domain Property in Google Search Console (GSC) via DNS
If you’ve ever wished for a complete view of how Google sees your entire website - across subdomains, www vs. non-www, and HTTP vs. HTTPS - verifying a domain property in Google Search Console (GSC) is your answer. This guide walks you through why domain properties matter and how to verify your domain ownership step by step by verifying your websites DNS records.
Why Domain Properties in Google Search Console Matter
Domain Property vs. URL Prefix
URL Prefix Property: Tracks a specific protocol and subdomain (e.g.,
https://www.example.com), so you’d need separate properties for variations likehttp://,https://,www, andnon-www.Domain Property: Consolidates all subdomains and protocols under one umbrella (e.g.,
example.com), giving you a single report for your entire domain.
Key Benefit: A domain property gives you a complete overview of how Google indexes all versions of your site, reducing confusion and manual effort.
Prerequisites for Domain Verification
Google Account: You’ll need a Google account with permission to add properties in Google Search Console.
DNS or Hosting Access: Verifying a domain property requires adding a TXT record to your DNS settings. Make sure you have access to your hosting control panel (e.g., cPanel, Plesk, or another DNS manager) to verify your DNS records.
Step-by-Step: Setting Up a Domain Property in GSC
Step 1: Add a New Property in GSC
Go to Google Search Console. If you have never used GSC before, click “Started Now”.
Click “Add Property” or the “+” button (usually on the top-left).
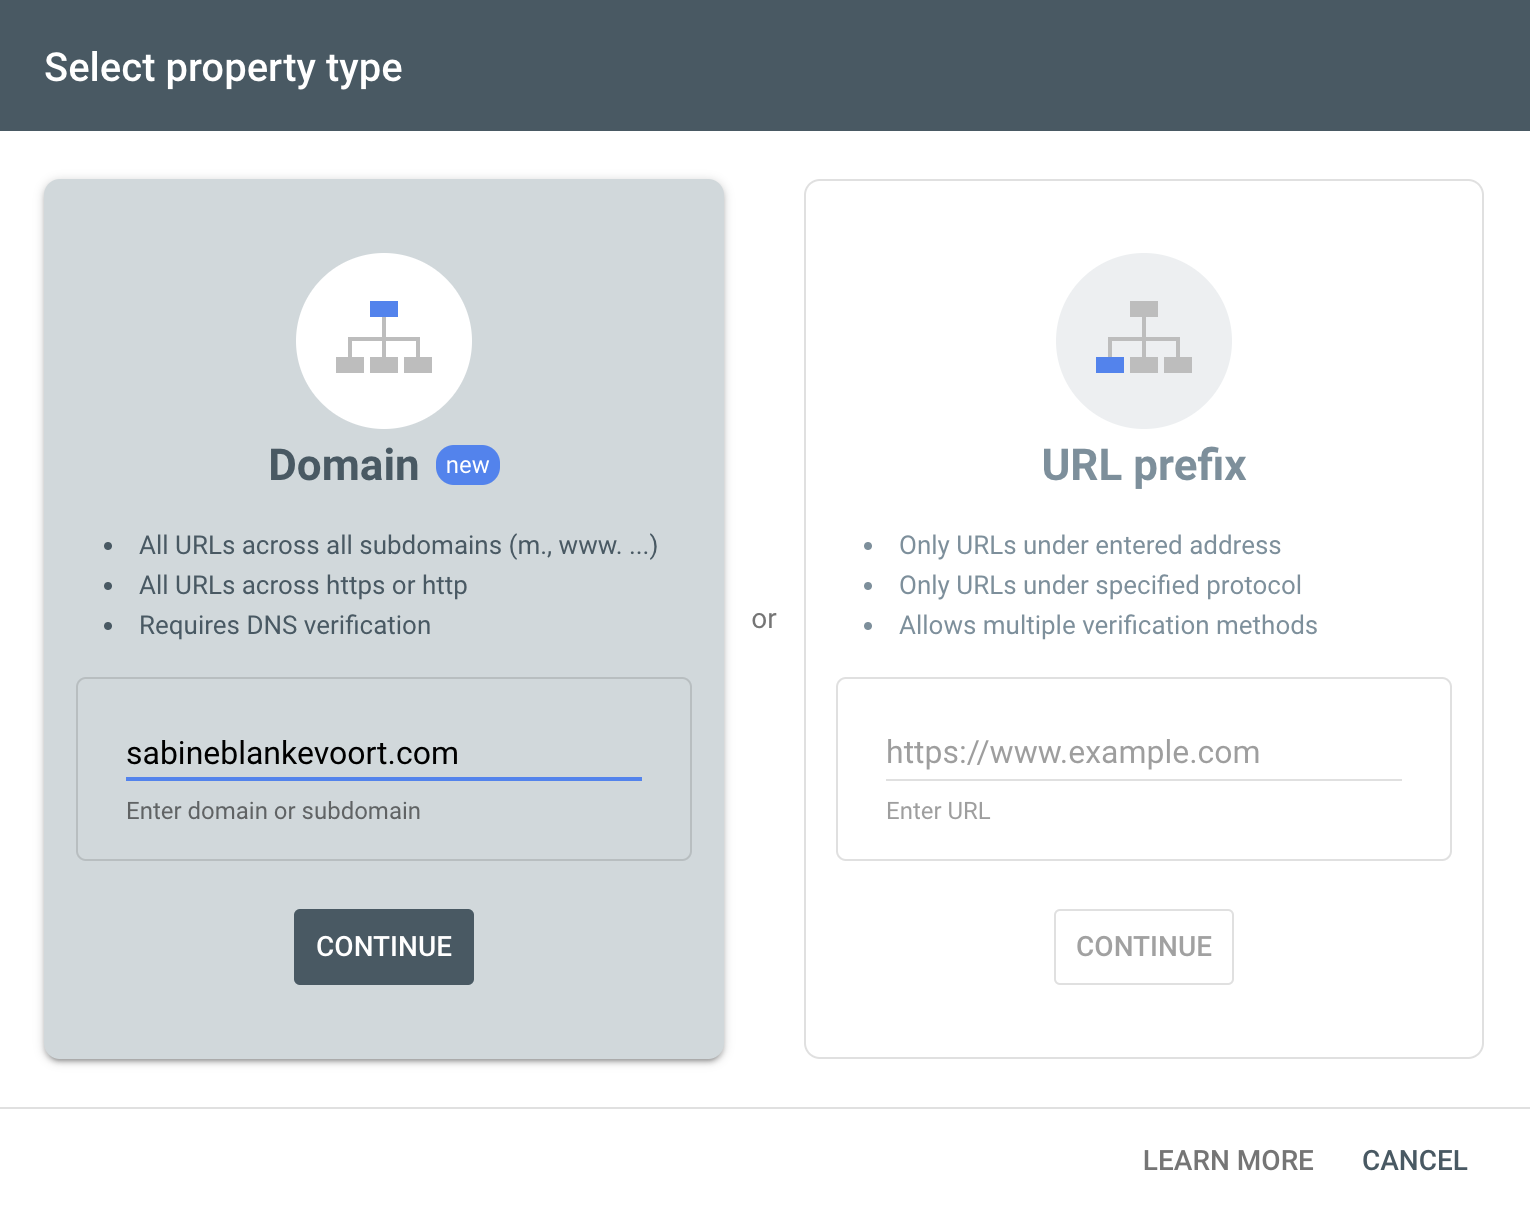
In the pop-up box, select “Domain” (instead of “URL prefix”).
Enter your root domain (e.g.,
example.com) without “https://” or “www.”Click “Continue” to proceed.
Pro Tip: Make sure you enter the domain exactly as your DNS provider recognizes it. For instance, if you manage example.com, don’t add protocol or subdomain details here.
Step 2: Copy the TXT DNS Record
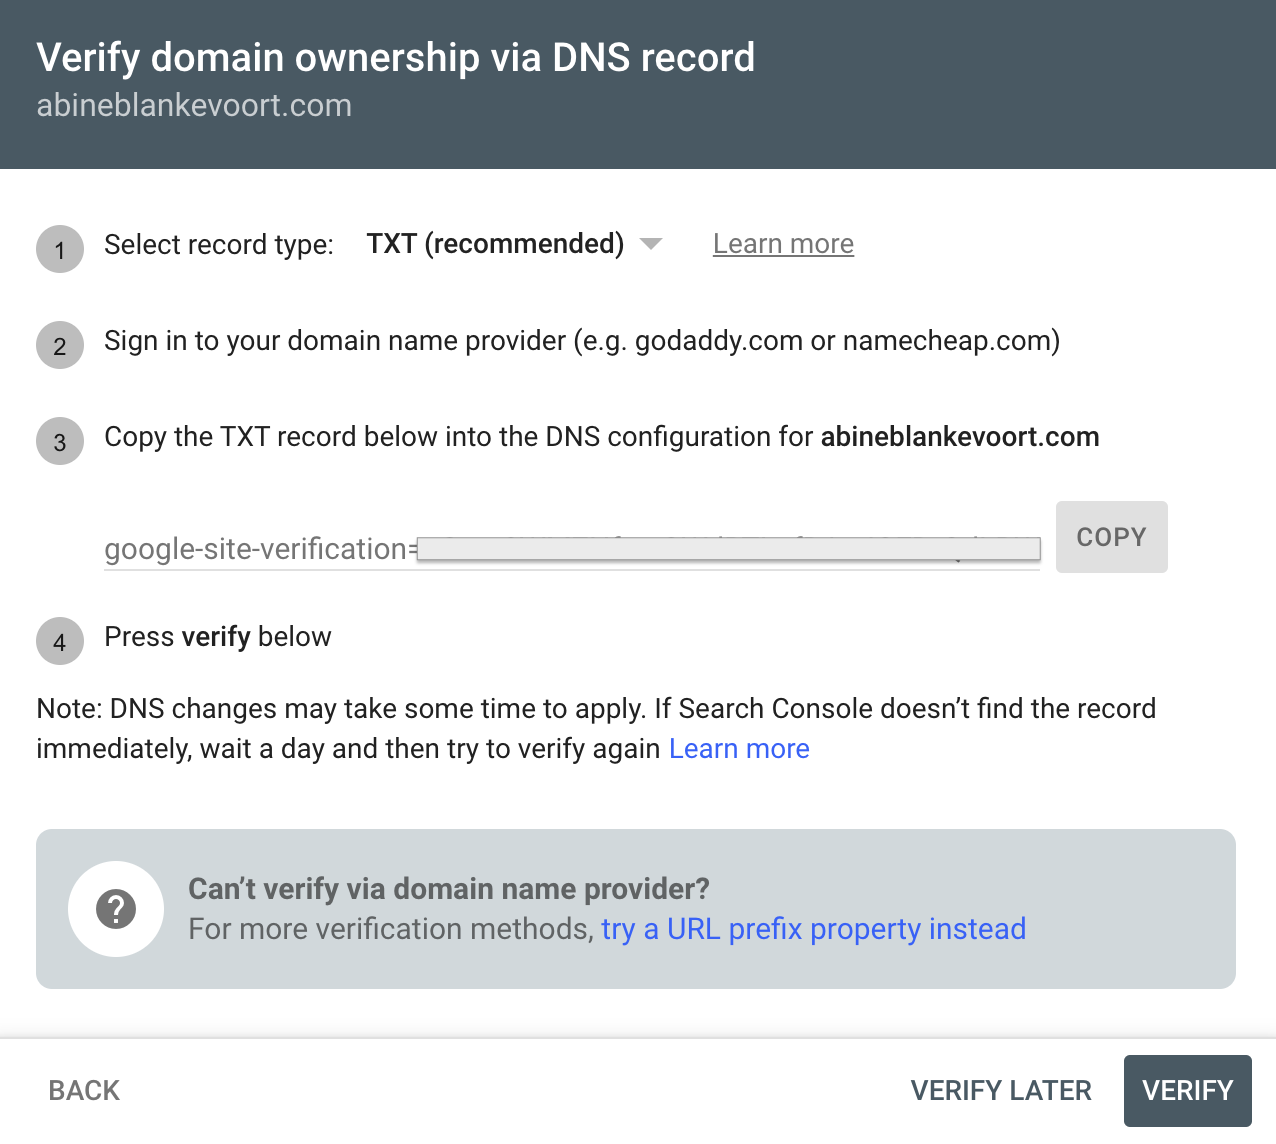
GSC will now generate a TXT record for verification. It typically looks like:
google-site-verification=xxxxxxxxxxxxxxxx
Copy this entire record and keep the window open (you’ll need it after updating your DNS).
Adding a TXT Record in Your DNS Settings
Step 1: Log Into Your Hosting Control Panel
Examples: cPanel, Cloudflare, GoDaddy, Namecheap, SquareSpace, or a custom domain registrar.
Look for a section labelled “Domains”, “DNS Management”, “Zone Editor”, or “DNS Settings.”
Step 2: Create a New TXT Record
Click “Add Record” or an equivalent button.
Choose “TXT” as the record type.
Fill in the fields as follows:
Name/Host: Your root domain (e.g.,
example.com). Some hosts might require you to leave this blank or just type@.TTL: 3600 (or your host’s default).
Value/Text: Paste the TXT record provided by Google Search Console.
Click “Add Record” or “Save” to confirm.
Important: DNS changes can take anywhere from a few minutes to 48 hours to propagate globally. It’s often much faster, but be prepared to wait if verification doesn’t go through immediately.
Updating DNS Setting in SquareSpace:
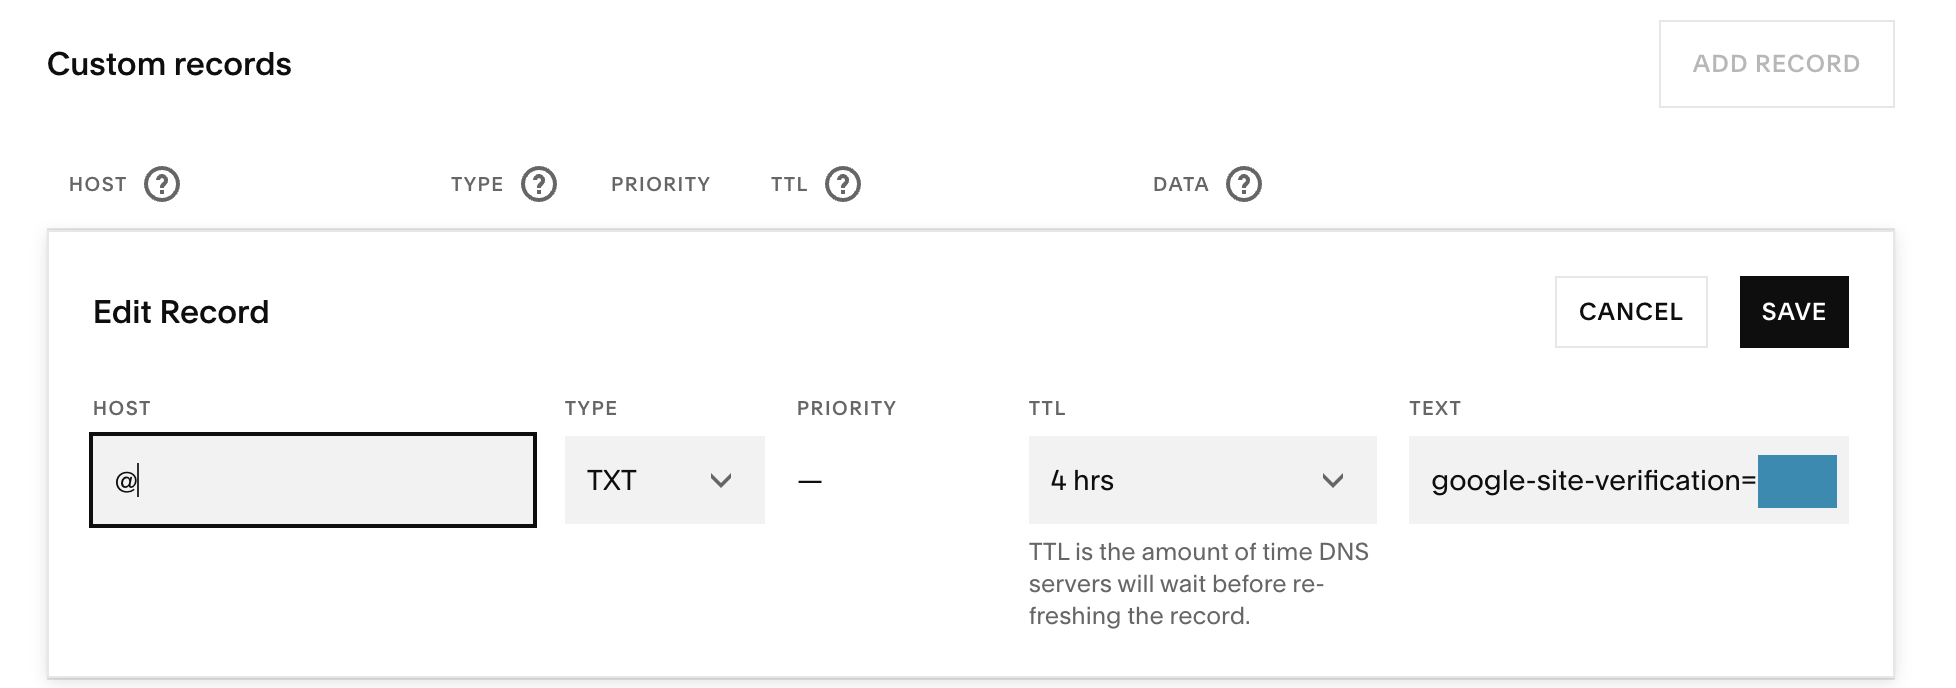
In SquareSpace, find the “DNS Settings” under “Domains.”
Select “Add Record” in the Custom Records section.
Fill in the fields as follows:
Choose “TXT” as the record type.
Name/Host: Your root domain - in SquareSpace just type
@.TTL: Use the default that is filled in when you select TXT.
Value/Text: Paste the TXT record provided by Google Search Console.
Click “Add Record” to confirm.
Verifying Your Domain in Google Search Console
Go back to your Google Search Console tab or window.
Click the “Verify” button.
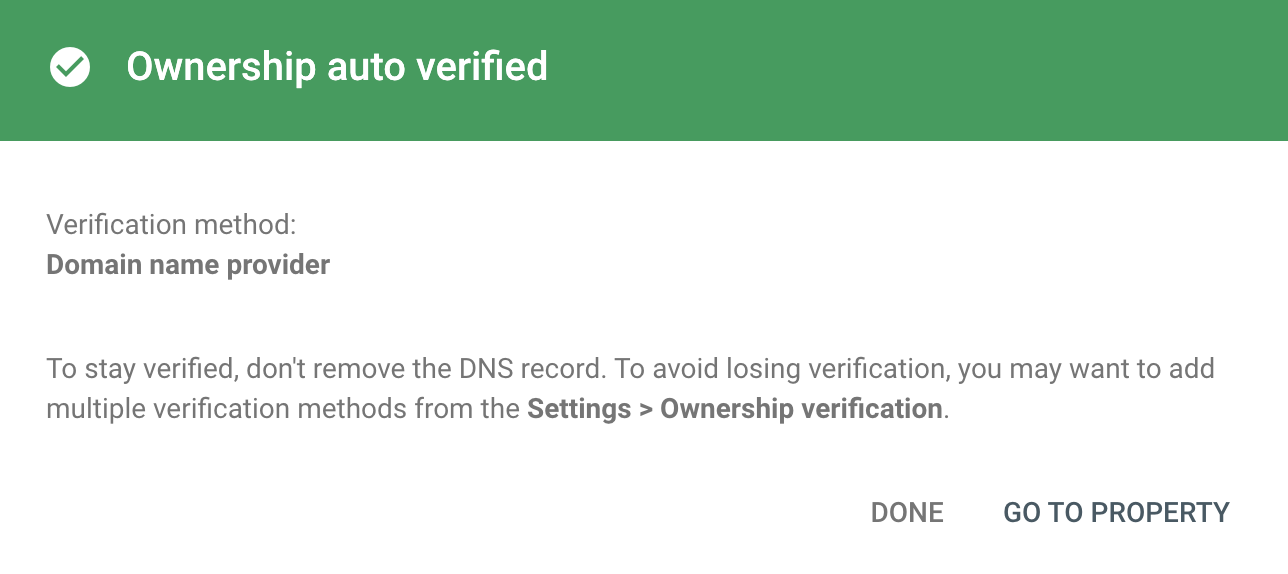
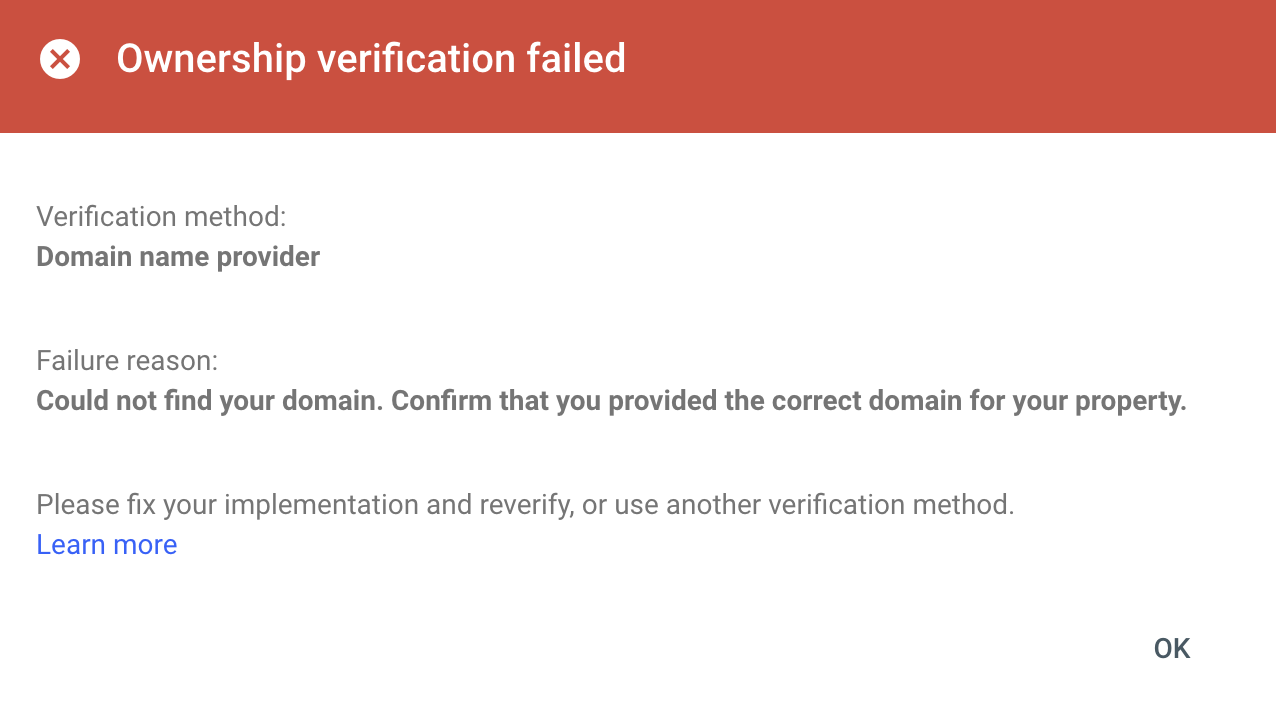
If everything updated quickly, you’ll see a success message almost immediately. Otherwise, you might see a failure notification. Don’t panic - just wait a few minutes or hours and click “Verify” again.
Typical Verification Times:
Sometimes it’s instant.
Often within 2–3 minutes.
Potentially up to 24–48 hours in rare cases due to DNS propagation delays.
Troubleshooting Common Issues
Verification Failed Immediately
Possible Causes:
You added the record to the wrong domain or subdomain. You can contact your hosting company as they should be able to give you feedback.
The TXT record was pasted incorrectly.
DNS changes haven’t propagated yet.
Solutions:
Double-check the domain name in your DNS manager.
Confirm the TXT record is pasted exactly as Google provided.
Wait at least 30 minutes and click “Verify” again.
Hosting Dashboard Variations
Issue: cPanel instructions don’t match your hosting environment.
Solution: Look for keywords like “DNS Editor”, “DNS Management”, or “Zone File Editor.” Consult your host’s documentation if you can’t find these options, or simply Google “How to add DNS records in (Host name)”.
Best Practices After Verification
Keep Old Properties
If you’ve previously added separate URL prefix properties (e.g., https://www.example.com, http://example.com), keep them. They can help you troubleshoot issues like redirect loops or canonical mismatches in the future.
User Management - How to add a user in GSC
Once your domain is verified, you might want other team members or clients to access reports and data. Here’s how to do it:
Open Your Domain Property
Log into Google Search Console.
Select the domain property you’ve just verified.
Go to Settings
On the left-hand sidebar, click “Settings.”
User and Permissions
Within the Settings menu, look for “Users and permissions” (or simply “Users”).
Add a New User
Click “Add user” (usually a button in the top-right corner).
Enter the email address associated with a Google account.
Choose Permission Level
Owner: Adding someone with this permission would mean they have ****full control over the property in Search Console.
Full: This allows the new user to view, edit, and configure settings.
Restricted: Allows read-only access to data without the ability to make changes.
Save Changes
Once you select the permission level, click “Add” or “Save.”
The new user receives an email notification with access to your domain property.
Pro Tip: Always use the least-privileged access necessary. If someone only needs to see performance data, “Restricted” permissions might be enough. Reserve “Full” access for team members responsible for technical or strategic site decisions.
Explore Your Domain Property Data
Consolidated Reports: All subdomains and protocols feed into one property now! This makes looking at all of your data easier to read and understand!
Coverage & Performance: Check how your site is indexed and which URLs are getting traffic. If your site is new, it may take up to 6 months for you to start seeing SEO results.
Enhancement Reports: Identify any structured data, mobile usability, or rich results issues.
FAQ about GSC
Do I need to remove my old URL prefix properties after verifying a domain property?
Not necessarily. Keeping them can be helpful for diagnosing issues with specific site versions (e.g.,
non-wwwvs.www).
What if verification fails repeatedly?
Confirm that your DNS record is correct. If the issue persists after 48 hours, contact your domain host support to figure out why.
Is DNS TXT verification the only way to verify a domain property?
For domain-level tracking, DNS verification is the primary method. Other options (HTML tag, Google Analytics) only work for URL prefix properties.
How soon can I see data in my domain property?
If you’ve previously had URL prefix properties, your data may show up instantly. Otherwise, data collection typically starts right after verification.
Your Next Steps
Verifying a domain property in Google Search Console centralises your site data, covering all subdomains and protocols in a single property. After setting it up via a TXT DNS record:
Explore GSC Reports: Performance, Coverage, Enhancements, etc.
Keep an Eye on Alerts: GSC will notify you of mobile issues, indexing errors, or manual actions.
Optimise Continuously: Use insights from GSC to refine your SEO strategy (keywords, site structure, content).
Pro Tip: If you’re planning website updates or migrations (e.g., moving from HTTP to HTTPS), verifying a domain property is especially helpful for monitoring the entire process under one roof.
Ready to Master Google Search Console?
If you have questions or hit any snags with DNS verification, feel free to drop a comment below or contact me, I’d be happy to set up your GSC for you! Domain properties in GSC might seem technical at first, but once set up, they offer a holistic view of your website’s performance. That’s invaluable for any site owner or SEO professional looking to make data-driven decisions.

